Tag: recipe

  • Patience Is the Secret Ingredient

    This is the winter staple in our house. My daughter lovingly refers to it as simply “Daddy’s Stew,” but it’s Guinness Beef Stew. Though I have made it with other Irish stouts… just don’t tell the naming police.

    Guinness beef stew is a modern take on traditional Irish stew. The original was made with lamb or mutton, but many modern versions lean into beef. It’s built on potatoes, onions, and root vegetables like carrots, thickened lightly with flour, then left to slowly transform. Over a long simmer, the meat becomes tender, the vegetables soften, and the flavors melt together into something rich and deeply comforting.

    One of my favorite parts is tasting it at the beginning of the two hour simmer, just to see how dramatically the flavors evolve by the end. It’s a quiet little reminder of what patience can do in a pot.

    Now, I know many people serve their Guinness beef stew over a cloud of mashed potatoes. I fully support that decision. I will never stand in the way of butter and cream meeting thick stew. But in our house, I go a different direction.

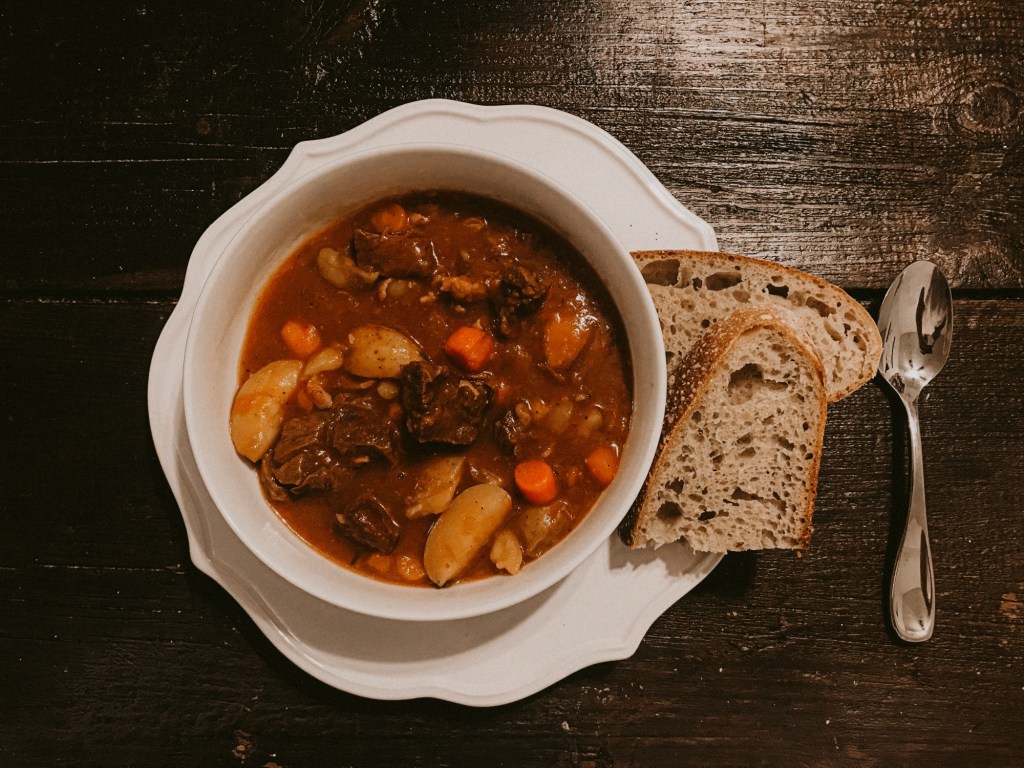
    I use fingerling potatoes directly in the stew. They hold their shape, soak up all that rich stout-laced broth, and give you little buttery bites throughout instead of one soft blanket underneath. It makes the stew feel complete in the bowl, like everything belongs exactly where it is.

    I also take a little extra care when prepping. Every ingredient gets cut into proper bite size pieces. Not rustic boulders. Not carrot logs the size of a toddler’s forearm. Spoon sized. Balanced. Intentional.

    A stew should fit perfectly on the spoon. A little beef, a bit of potato, a slice of carrot, all in one bite. That’s the goal. Every spoonful should taste like the whole pot. It’s a small detail, but it changes everything.

    And then there’s the bread. A big, hearty slice of sourdough. Not optional. You need something with structure, something that can drag through the bottom of the bowl and come back heavy with broth. If you are not wiping the bowl clean with bread, we have made a serious tactical error.

    This is not a rushed meal. It is not a weeknight shortcut. It asks you to slow down. To let the beef brown properly. To let the onions soften. To let the stout do its quiet work in the background while the house fills with that deep, savory aroma that makes everyone wander into the kitchen asking when it will be ready.

    You can’t bully a stew into greatness. You can’t crank the heat and hope for magic. The transformation happens low and slow, in its own time.

    And somewhere between the first taste at the beginning of the simmer and the last spoonful from the bottom of the bowl, you remember something simple.

    Patience is the secret ingredient.

    Guinness Beef Stew

    Chef’s Note: I like to make this in an 8 quart (7.5 L) Dutch oven. It’s the perfect size to let everything simmer comfortably without overcrowding, and it distributes heat beautifully so every bite cooks evenly.

    Ingredients

    1134g Chuck Roast, cubed into bite-sized pieces

    30 ml Neutral Oil

    170g Bacon, cut into lardons (Round up to the nearest slice)

    2 Medium Onions, diced

    3 Garlic Cloves, minced

    24g All-Purpose Flour

    56g Tomato Paste

    680g Fingerling Potatoes, halved or quartered depending on size

    2 Carrots, cut into bite-sized pieces

    960 g chicken broth

    1 Bottle (330 ml) Guinness beer or other Irish stout

    2 Bay Leaves

    4 Sprigs Fresh Thyme

    Salt and pepper, to taste (Season as you go)

    Method Of Production

    1. Heat 30 ml of oil in your 8-quart Dutch oven over medium-high heat. Season the chuck roast generously with salt and pepper. Brown the meat in batches… crowding the pot is a sin. Remove browned meat and set aside.
    2. Brown the bacon until crisp.
    3. Toss in the onions and garlic, sautéing until soft and fragrant. This is where the smell starts to make your house feel like heaven.
    4. Sprinkle in the flour and stir until everything is coated.
    5. Add tomato paste. Mix carefully, scraping the bottom so it doesn’t burn, but allow the tomato paste to cook for a minute or two to deepen the flavor.
    6. Pour in the chicken broth and Guinness, scraping the bottom of the pot to lift all those delicious browned bits (the fond).
    7. Add the browned meat back into the pot.
    8. Add the fingerling potatoes and carrots.
    9. Add in the bay leaves and thyme sprigs. I like to tie them together into a little sachet using butcher twine so they are easier to remove later.
    10. Bring everything to a gentle simmer. Reduce heat, cover, and cook for 2 hours and 15 minutes, stirring occasionally. This is where patience starts to taste like magic.
    11. Uncover and simmer for an additional 45 minutes, stirring occasionally. Watch that broth thicken, the flavors deepen, and your kitchen fill with irresistible aromas.
    12. Remove bay leaves and thyme sprigs. Taste, adjust salt and pepper if needed.

  • Sorry Grandma, My Biscuits Are Better Than Yours

    Grandma is probably rolling over in her grave.

    I come from a long line of biscuit makers. My great grandmother taught my grandmother, who taught my mom, who eventually taught me. And no, I’m not talking about the British biscuit, the crisp cookie. I’m talking about the Southern staple that has anchored our tables for generations. And let’s be clear: biscuits are not just for breakfast.

    Southern grandmothers didn’t use recipes. They used instinct. A spoon, a bowl, a rolling pin. That was it. They mixed by feel. They judged the dough by touch. And if you looked like you were about to knead it too much, you risked getting smacked with that spoon.

    For years I was terrified to “work the dough.” I thought if my hands lingered too long the butter would melt, the structure would collapse, and my ancestors would collectively disown me.

    Fast forward a few decades.

    Now I make my biscuits in a stand mixer. I work the dough more than Grandma ever would have allowed. And here’s the part that feels almost sacrilegious to say out loud: I can make biscuits better than Grandma.

    Sorry, Grandma.

    There is one thing I will never change, though. White Lily is the flour for biscuits. Not because Southerners cling to brands out of blind loyalty, but because it’s milled from soft red winter wheat with around 9 percent protein. Most all purpose flours sit at 11 to 12 percent. That difference matters. Lower protein means less gluten development, which means tenderness. It’s built for biscuits. Not bread.

    This isn’t a recipe I expect you to nail on the first try. It might take a few rounds before you make one you’re proud of. Stick with it. It’s worth it.

    Eventually you won’t need the measurements. You’ll stop looking at the bowl and start feeling the dough. You’ll know when it’s ready.

    That’s why this post took me so long to write. I’ve been making biscuits by instinct for years. I couldn’t have told you the weights if you asked. I finally had to slow down, pull out a scale, and measure as I went.

    Somewhere along the way, feeling turned into numbers.

    And now you get both.

    Buttermilk Biscuits

    Ingredients

    350g AP Flour

    18g Baking Powder

    8.5g Salt

    56g Frozen Butter

    225g Whole Fat Cold Buttermilk (Life is too short for low fat buttermilk)

    50g Melted Butter  

    Method of Production

    1. Preheat oven to 350°F.
    2. In the bowl of your stand mixer, whisk together your flour, baking powder, and salt.
    3. Using your grater or Microplane, grate the frozen butter into the bowl of the stand mixer with your flour, baking powder, and salt mixture. Using the paddle attachment, mix at slow speed until the butter is well incorporated into the mixture. The flour should look coarse and mealy.
    4. Next, with the mixer still on low speed, slowly add the buttermilk until a shaggy dough forms. Stop mixing.
    5. Turn the dough out onto a lightly floured surface. Lightly flour the top of the dough and your hands and begin to gently press and fold the dough over on itself until the dough no longer feels wet and shaggy.
    6. After folding the dough over on itself a few times, lightly flour your rolling pin and begin to gently roll the dough out into a rectangle that’s ¾ – 1 inch thick.
    7. Fold the dough in half onto itself. Using the rolling pin, gently roll the dough out into another rectangle that’s ¾ – 1 inch thick. Repeat the fold and roll process 3 more times to build layers. *Note: You may have to lightly flour your rolling pin again.
    8. After you roll out your dough for the last time, use a 3-inch biscuit cutter. Dip your biscuit cutter in flour and cut straight down into the dough. Do not twist the biscuit cutter. Twisting seals the edges and hinders the biscuits from rising properly. Try to cut each biscuit as close to the edge of the dough as possible and as close to the previous cut as possible. I like to play a little game to see how many biscuits I can get on the first try.
    9. Place biscuits together on a parchment paper-lined baking tray, touching each other. They are communal and do better together. As they bake, they cling to each other and rise together.
    10. After you’ve cut as many biscuits as you can from the first roll out, combine the scraps and repeat steps 7–9. You won’t get as many biscuits as before, but there should be enough scraps to get one or two more.
    11. Bake in the oven for 15 minutes, then rotate the tray 180 degrees and bake for 15 more minutes.
    12. Remove from oven and brush hot biscuits with melted butter.
  • Salt Has Been Trying To Tell Us Something

    Season your damn food! Seasoning gets treated like a finishing move, a sprinkle at the end, a shake of pepper, and a hope and a prayer, but that is not how good food has ever been made. For most of human history seasoning was not about preference or personality because it was about survival. Salt mattered because food mattered. Before refrigeration salt was how meat lasted and how vegetables made it through winter. Entire trade routes existed because of salt, and Roman soldiers were even paid with it, which is where the word salary comes from. Salt was currency and power and preservation. It was never optional. Somewhere along the way we decided salt was dangerous and seasoning became something to fear instead of something to understand.

    Salt does not make food salty because its true purpose is to make food taste like itself. It pulls flavor forward and sharpens what is already there. When you season early salt has time to dissolve and move into the food so that proteins hold onto moisture better and vegetables release water to cook instead of burn. Waiting until the end to season is not restraint. It is indecision. Building flavor means seasoning as the food changes. You salt onions before they brown so they soften and sweeten. You season meat before it hits the pan so the inside tastes as good as the outside. You taste after something reduces because concentration changes everything. You adjust again when fat shows up because fat smooths edges, and you taste when you add acid because acid tells the truth.

    If you only season once, you are not building flavor but are instead reacting to it. Pepper has a role, too, and historically it was treated with respect as a sign of wealth. It was used intentionally rather than dumped on everything. Pepper is aromatic and lives in your nose as much as your mouth. Add it early and it melts into warmth, but add it late and it preserves its bright, aromatic, and pungent flavor. Pre-ground pepper has already missed that moment and should be thrown out. Buy a pepper grinder and whole peppercorns. Toast the peppercorns until aromatic in a dry skillet before putting them in your pepper grinder.

    This brings us to the most ignored part of cooking, which is to taste your food. If you are not tasting your food, you are not cooking; you are just following instructions and hoping things work out.

    Flavor changes as food cooks. What tasted fine ten minutes ago might not taste right now. Recipes do not know what your ingredients taste like or how salty your broth is or how hot your stove runs. You do. Taste after you salt and after something reduces. Taste after you add acid and before you serve. People who worry about oversalting usually do not taste enough. Tasting early prevents mistakes while tasting late creates them. Professional kitchens taste constantly because food moves. Seasoning is a conversation you keep having until the food is done talking. Once you season in layers and taste along the way cooking gets easier. You do not need a bigger spice rack. You need to pay attention to what you are cooking because flavor is built on purpose.